Remember
last week when I told you that my oldest daughter decided she wanted a homemade costume instead of this
Target devil? Of course I couldn't resist her sweet request, so we spent a few hours this weekend crafting up our new creation, which is.....
...wait for it.....
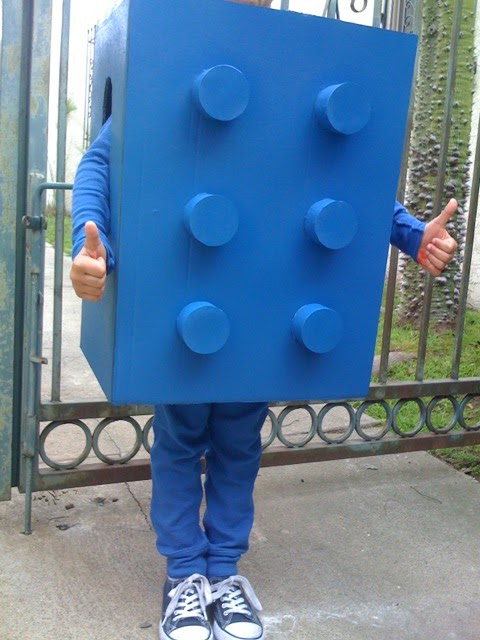
...a Lego!
I can't take credit for this idea - I spotted it online somewhere a couple of weeks ago - but it met all of our requirements: something fun and unique, something easily made at home, and something fairly inexpensive. So when the kid said she wanted something homemade, this came to mind.
I've seen legos come in all the colors in the rainbow (our favorites are the white ones we picked up at Legoland San Diego this summer), but since I wanted to make the costume easily recognizable, I decided to stick with a primary color. I found
this great bright blue long underwear set at Target, and a nearly matching Valspar spray paint at Lowe's. We also picked up a rectangular box and six small round $.99 craft boxes from
Michael's for the iconic lego circles. Add in a hot glue gun and exacto knife to cut holes in the box, and we had everything we needed to get it together.
After some strategizing, we decided to cut a separate piece of cardboard for the front of the box (we had some leftover boxes in the garage from our move) so you wouldn't see the box closure seam, and then hot glued the craft boxes to the cardboard:
Then we taped both sides of the box closed, cut one end out completely (where her legs would be) and cut a head hole in the other end. We cut arm holes on each side - large ovals so she can move her arms around as much as possible, and glued some foam to the inside - where her shoulders will rest - for comfort.
Finally, we hot glued the front piece on to the box and got to painting! I used my trusty spraybooth (a.k.a. BBQ box) and went to town. A couple of coats later and it was looking amazing!
Here's the finished product, ready to go for next weekend!