Thursday, September 30, 2010

The Great Sofa Hunt of 2010


As I mentioned in an earlier post, I have a ”thing” about sofa arms. This “thing” started a few years ago, shortly after purchasing our Case Study Day Bed at the Modernica annual warehouse sale. At the time we were looking for something to replace our enormous IKEA sleeper sofa, which had been repeatedly scratched up and peed on by our cat (thanks, Astro) and this seemed perfect. Small in scale, sleek and streamlined, it would allow us more room to fit a dining table and chairs into the one large living/dining room area, and could still serve as an impromptu guest bed if need be, with the back cushions removed. 

Soon after we got it, however, I realized something terrible. At 27H x 77L x 33D and no arms in sight, there would be no cuddling of any kind going on atop this sofa. No arms also meant no leaning of any kind, so even if you were couching solo, your choices were to sit erect, er, upright, which is not very relaxing, or lay down completely.

When we moved into our new house I was thrilled to be able to finally bring a soft, cozy, and fully-armed addition into our furniture family. The daybed could stay, and found a nice home in our formal living room, but our den was just begging for a comfy sectional prime for spooning and snoozing.

Since we wanted to find something of good quality that would last for many years, we knew we’d have to make an investment. Our must-haves, aside from comfort, construction and contemporary, clean-lined styling were 1) arms 2) removable cushion covers for easy cleaning, and 3) a neutral fabric that would transition with us through any décor changes.

We scoured local shops and online resources for weeks, photographing and bringing swatches home for consideration, but nothing quite measured up. I felt like the Goldilocks of sofa shopping (minus the actual golden locks):
 
Too small

Too big
 
Too mismatched

Too leather


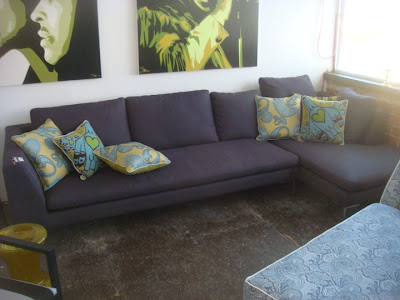
Then one day we spotted her. She was lovely. Her heathered oatmeal upholstery would blend perfectly with our white walls, tan carpet and gray accent pieces – check. It could all be removed and dry cleaned – check, check. And just look at those arms. Tall and supportive, down-filled throw pillows to cradle my head, and a chaise lounge big enough for two – check, check, check! Wrap ‘er up, Blueprint! (Side note: as painful as it was to part ways with my cash, we saved a few dollars by picking up vs. delivery and I Scotchguarded it myself at home.)


Just right!

In the three short months since we’ve moved in she has already lulled me to sleep many a night, hosted numerous gatherings of friends and family, and babysat the kids (with a little help from Yo Gabba Gabba) while I hit the snooze button/made dinner/wrote this post/etc. Looks like this Goldilocks' search paid off...but no porridge-eating on the sofa! 


Wednesday, September 29, 2010

Man's Best Friend? Part II


A warning for the gardeners...

Apparently bees don’t speak English, because despite our kindest request for them to move on, they did not. Time to call in the big guns, or in this case, the Backwards Beekepers. I found them online after a quick Google search, “a group of organic, treatment-free beekeepers in Los Angeles.” They’re "backwards", they say, because they rely on observation and natural practices to keep their bees thriving rather than pesticides or chemicals of any kind. Their blog also offered a “bee rescue hotline,” which we rang right up. We needed the bees to go before they built a hive and laid eggs – that’s when they would become aggressive – but we didn’t want to kill them in the process, so this seemed like the perfect solution. Despite bee-ing (ha, ha) a little annoyed that I had to spend $60 to get rid of these guys, I was completely fascinated and excited to watch the whole process (from behind the kitchen screen door of course!)

Two hours after calling, Vincent of Vee’s Bees arrived at our door. After investigating the bees he determined that they most likely were not going to relocate and had to be removed. First, he sprayed them with sugar water to give them some nourishment and make them as calm as possible. Then he was back out to his truck to assemble the box he would collect them in and to put on his beekeeper suit (this is what I had been waiting for!)


Hat, smock and gloves donned (on the hottest day on record in LA, mind you) Vincent made his way back to the tree and began cutting away the branches to get to the swarm. After each branch he snipped he had to wait about 5-10 minutes to let the bees calm back down.


We interviewed him from the kitchen while we watched and found out that yes, these were likely Africanized bees, that there was a queen in the center that they were all protecting, and that he estimated our swarm held about 10,000 bees. He guessed that they probably came from another hive that had become overcrowded.

When Vincent finally snipped the branch that held the swarm, most fell into the box below, while others fell like little pebbles onto the concrete ground. He was confident that the queen was in the box, because most of the bees began following her in there.


He waited about 10 minutes for the rest to make their way, and then started sucking up the stragglers with a vaccuum (a bunch had clustered on the edge of our recycling can, which he assumed the queen had left her scent on at some point.) After that it was time to pack up and go.


The box was closed and taped shut, and Vincent told us that any remaining bees would be gone within the next few hours….and they were!

I plan to call Vincent and order some of his honey by mail so we can have a little memento to remember this by. Our very first swarm of bees – what a milestone!


Tuesday, September 28, 2010

Man's Best Friend?

We haven’t had a pet in years. Aside from a few betta fish (we’re on our third one now) the last legitimate house pet we had was our cat, Astro. I adopted Astro when we lived in Boston, about 13 years ago, and he was with us until the year after my oldest daughter was born. Since then, we’ve been hesitant to add another member to the family – between work and the kids and everything in between, I don’t think we have the time for it, and up until our recent move we just didn’t have the space.

Now that we have a backyard and easy access to the street (our condo was on the third floor – another pet deterrent) my kids are begging for a dog, and while I do see one in our future (my husband and I both had dogs when we were kids and want to give our kids that experience as well) we want to get a bit more settled into the house before we add fur and drool and chew toys in the mix.

Luckily we’ve had a few visitors since we moved in that we’ve been able to entertain the kids with and (sort of) pass off as pets:


The kids named this guy (or gal, not really sure) Sammy Super Spider. We found him/her hanging from the front of our house one evening, and s/he lived there for about a week, until s/he moved over to the side of the house. Every night at dusk s/he would build a beautiful and intricate web the size of a wok, and every morning s/he would take it down, crawl up to the eaves of the house, and wait out the sun. After much Internet research we decided s/he was an American House Spider, harmless to us, and let shim carry out his/her daily routine. The kids ran to check on it in the mornings before school and when they would get home. Catches its own food, cleans up its own house – the perfect pet!

Sammy hasn’t been home for a few days now, but s/he seems to have been replaced by some new visitors. While at a neighborhood council meeting yesterday afternoon (the planning for our annual Halloween Haunt is underway!) I got a text from Leon that said “we have a huge problem.”  Since he texted me this information, I knew that the problem couldn’t be that huge – a significant injury or natural disaster probably would have warranted an actual call, although the message did sound ominous. “What?” I responded. “Massive swarm of bees in the backyard,” he typed.

Oh. Well, that doesn’t sound so bad. How massive could it really be? This massive actually:


WTF? Where did all these bees come from? Were they making a nest in our lime tree? Were they planning to uproot the tree and fly off with it? Back to the Internet for more research. Turns out they are likely not here for good, and were probably just passing through on their way to their new nest. Apparently they swarm around the queen while scout bees seek out a suitable nesting site. Only rarely do they start building a comb on a tree limb, since they usually prefer more of a protected cavity.

Although they aren’t as fun as Sammy Super Spider, since we can’t get close and watch them (in fact the kids aren’t allowed in the backyard until they’re gone) it’s so interesting to read about the queen and the drones and their instinctive behaviors. We’ve been checking in on them every few hours, hoping that they’re just passing through, but until then, I can’t go into the garage or take out the trash, which is especially upsetting considering the bags of recycling left over from our Sunday BBQ and cluttering up my back hallway. 


Luckily it's been so hot that we're not missing spending time in the backyard, but we can't let them take over our tree, so the bees have been officially served with a 24-hour notice to vacate the premises. We'll see if they listen...

Monday, September 27, 2010

Treasure Hunt

Despite it officially being Fall now, temps reached over 100 in parts of Los Angeles on Saturday. So what better day to start emptying out our storage unit, right? Ugh.

While we were living in our condo we desperately needed the additional space, but now that we have more square footage and a garage, hanging onto the storage was a waste. It'll take a few trips to get it fully emptied out, but I was excited to get a jump on it.

One of the boxes we brought home was full of treasures that my Grandmother left me when she passed away. Although it was years ago, I didn't have the opportunity to incorporate them into our home until now. In addition to the lack of space, I was hesitant to have these sentimental and breakable items laying around when the kids were babies, but now that they understand (most of the time) what's for touching and what isn't, I was so happy to finally add some of them into our existing decor:


I was also super excited to uncover a couple of old photo albums, including my grandmother's wedding album, and this one, full of baby pics of me!


It's amazing to be able to look around my home and be reminded of my Grandma, and so nice for my girls, who likely won't remember meeting her when they're older, to have some little pieces of her history.

Friday, September 24, 2010

Nook Look

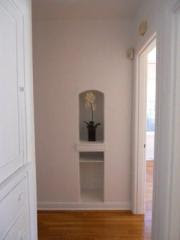
Our home has lots of charming period details (it was built in 1927), including this cute little hallway nook, that I think was meant for a phone and phonebook back in the day:


This was how the nook looked when we bought the house, and although I would have loved to put a vintage phone in there, like this one from the amazing LA store, OK


…the phone jack had long been removed or covered up. Since it isn’t really a necessity, we aren’t going to spend the money to have one put in, but because this hallway connects the front of the house with the den, holds the main bathroom that guests use, and is visible from the dining room, I wanted it to be a pretty passageway that tied well into the scheme of the other rooms. I started with a white vase (an IKEA find from years ago) since the shape fit well with the tall, narrow space, and although I tried my best to keep fresh flowers in there, the lack of lighting had them wilting within a couple of days. As much as I don’t love faux flowers, it seemed like the right place for them, so I picked up a couple of green hyndrangea stems (my favorite summer flowers) from Target:


Since we don’t have any use for an actual phone book, I opted to fill the mini shelf with two flea market dictionaries we snatched up years ago, to echo the vintage feel of the space:


To add a bit of color and personality to the wall, I matted and framed two of my preschooler’s art projects in Aaron Brothers frames (gotta love their one cent sale!) that we had previously used in our condo bathroom to hold a pair of botanical prints, but weren’t the right fit for our new house:


I also jumped at this beaded diamond dhurrie runner from West Elm when I spotted it on sale a couple of months back, and in a moment of luck, it’s the exact length of the wall. It adds a bit of depth to the hallway and really helps frame the space instead of making it just feel like a transitional area


Finally, I turned the bottom shelf of the nook into a mini-shrine for my beloved Domino magazine back-issues. I’d love to snag a great sculpture or other flea market find to fill this spot in the near future, but until I track down the right piece I will continue to pay homage to the dearly departed Domino. So this is how the space stands now,although knowing my habit of rearranging, I'm sure it won't last long. Maybe a bright coat of paint inside the nook, maybe more artwork on the walls?


Wednesday, September 22, 2010

Fence Me In

Our front yard is one of the nicest features of our home. Well-manicured green grass, two beautiful agave plants, and plenty of space for the kids to play. What we don't like, however, are the shrubs that line the edge of our property at the sidewalk. They're sparse, dry (despite regular watering and gardening) and don't provide us sufficient privacy from the passersby on their way to the neighborhood bakery and restaurants.


See how our neighbors have that lovely and tall hedge,
and we have these puny, sad shrubs?

We're eager to make a change, and had narrowed it down to two options, either a hedge wall (like our nieghbor's) or a wooden fence, similar to these inspiration photos:

As much as we like the look of a privacy hedge, we were hoping to find a solution that didn't require watering, but we also weren't thrilled about the costs of a custom-built wooden fence, since we wouldn't really be happy with a standard off-the-shelf fence from a home improvement store.

Well apparently the fence Gods were on our side, because we got a call from a friend who had about 50 feet of wooden slat wall that they no longer wanted to store. One Uhaul rental, two trips and lots of sore muscles later, we have a driveway full of fence!


Don't you love it when things work out that way? We're hard at work planning out a configuration for our new fence, and can't wait to get it installed!

Tuesday, September 21, 2010

Put a Pin In It

Now that the kids are back to school, my house has become overrun with papers - homework, notices, calendars, order forms, graded tests, etc., and although I hate having it laying around the kitchen counter and dining room table, most of it contains important information that my family will need to reference on an ongoing basis:


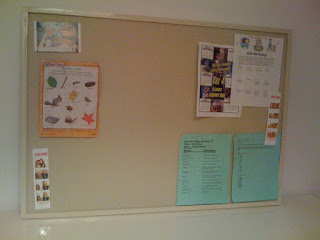
Since we're in the middle of our kids' room refresh, which will include a new studyworkspace for my second grader, I wanted to find an organized and visually appealing way to post these kind of papers in that space, along with other fun photos and goodies they want to display. I took stock of what I already had laying around to work with (a large black IKEA Ribba frame that I had broken the glass for - oops, some creamy white glossy spray paint left over from my chair rehab project and some organic cotton from a sewing project I  never started) and decided to make a DIY bulletin board.

I stopped over at our nearest arts & crafts store, Pearl, and picked up a piece of foam core board (my husband suggested the black board since the white has a thicker coating and might be harder to push pins through.) They had some large, slightly damaged pieces laying to the side, but since I was going to cut it down, that worked fine for this project. After paying them $2 to cut it to size and $3 for the foam itself, I saved about $12 off what it would have cost for a brand new board.

Once we were back home we primed the black frame in the driveway. I let my daughter complete this step...


...and while that dried, I started on the board by laying it over the fabric and cutting the fabric down, leaving a couple of inches on each side so I could wrap it around and staple it. I made sure to pull it tight so there wouldn't be any folds or wrinkles once I flipped it over:


Once the board was wrapped and the primer dried, I gave the frame two coats of spray and let it dry overnight. Then I popped in the board and started pinning!


I can't wait to see how this looks up on their wall when the room is done and ready to accessorize!

Sunday, September 19, 2010

Greige


While flipping through the October 2010 issue of Real Simple, I came across this beautiful collection of nail polish in "greige" tones:


With fall officially upon us in less than one week - yikes! - I fell in love with the richness and warmth of these colors. A "trend worth trying" they called it, so try it I did! While enjoying an indulgent mani/pedi birthday celebration for my good friend Annamarina at Color Me Green, I went with a similar tone by Sparitual, called Hypnotic, and I love the mettalic purple, gray and brown hints to it:


I also plan to add pops of greige throughout our home, and think it could be a great jumping-off point for a room's design, whether in wall color, bedding, artwork or accessories:


Thursday, September 16, 2010

Serenity Now

Due to limited space, most of the rooms in our condo had to do double duty, including our bedroom hallway/closet, which also doubled as an office space for us:


But since Leon and I have very different working schedules (he’s a night owl and is content to stay up until 2AM, my brain turns off around 9:30 and I’m usually asleep by 11) this system never worked out that well. Thankfully in our house now, Leon has his own office and I can have lights (and music) out whenever I want. To make the most of this newfound serenity, I’ve been slowly changing out some of our bedroom furnishings and décor. The first to go were our Malm dresser and bedside tables.


As affordable and streamlined as they were, these pieces did little to warm up the room, and the match-matchy set made me feel like I was living in a catalog, not a refined master suite. But while perusing some home design blogs last month, I came across an inspired bedside table DIY project, and fell instantly in love:


Which actually started out as this:


Amazing, huh?

The instructions were so thorough and it seemed so easy (and cheap!) I was off to IKEA and Lowe’s that weekend to pick-up the materials, but when I got home and started to assemble the frame of the tables, I realized they were going to be way to high for our bed. Since there was no turning back now (boxes were open, screws were drilled) Leon suggested we shorten them by cutting the side pieces down to 20 inches and making them two drawer tables vs. three – brilliant! Between that and Friday night’s foot massage, he’ll be in good with me for a while.

I lugged the side pieces to work with me the next week and ran over to Anawalt lumber on my lunch break to get them cut down. $2 and 20 minutes later it was done! The following weekend I stained, primed and painted, following the original posting instructions pretty closely. They did a great job providing very detailed directions and materials lists, and although I went slightly darker on the stain than the original project (I went with Moorish Teak by Zar) and ordered these drawer pulls instead, I’m thrilled with the way they came out. Not only do we still have plenty of room to stash our “unmentionables,” but the drawer pulls complement our lamps (thrift store finds) beautifully.


Now onto my dresser replacement, which was an exciting flea market find last month. I’m finally starting on its rehabilitation – can’t wait to share the before and after!